네이버클라우드 실무사용법030 : 쿠버네티스 ( Kubernetes ) 사용하기
작성자 정보
- 관리자 작성
- 작성일
컨텐츠 정보
- 9,123 조회
- 0 추천
- 목록
본문
쿠버네티스 ( Kubernetes ) 사용하기
1. 클러스터 생성
쿠버네티스 사용을 위한 클러스터 생성
Containers > Kubenetes Service > +이용신청 > 약관확인 > +생성하기 >
1단계 : 클러스터 설정
.클러스터이름 : k8s-20230824
.하이퍼바이저 : XEN
.Kubernetes 버전 : 1.25.8
.CNI Plugin : cilium
.VPC : vpc-test-ss * Kubernetes 클러스터 생성을 위해서는 IP 대역(10.0.0.0/8,172.16.0.0/12,192.168.0.0/16) 내에서 /17~/26 범위의 Subnet, 로드 밸런서 전용 Subnet이 필요합니다.
.가용Zone : KR-2
.네트워크타입 : Private
.Subnet : ss-vpc-kube-sub2 *앞서
생성해둔 subnet
.LB Private 서브넷 : ss-vpc-lb-sub3 *앞서 생성해둔 LB용 subnet
.최대노드수 : 10
.Audit Log : 미설정
.ACG 설정 :
* Kubernetes Service를 위한 ACG는 자동 생성됩니다.(예: nks-*)
주의사항
Kubernetes Service 콘솔 이외의 기능으로 서버 자원(VM), VPC, Subnet을 수동으로 정지 또는 삭제하는 경우 클러스터에 오류가 발생할 수 있습니다.
Kubernetes 워커노드 자원을 반납하는 경우,
Kubernetes Service 콘솔에서 반납해 주시기
바랍니다.
>다음 >

NAT Gateway 생성 안내 팝업창은 [확인] 버튼 클릭 후 이후에 진행한다.
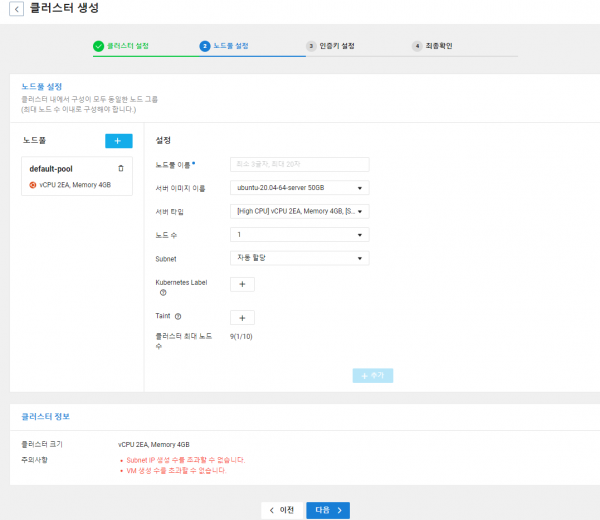
2단계 : 노드풀설정
.노드풀
이름 : default-pool
.서버이미지이름 :
ubuntu 16.04
.서버타입 : [High
CPU] vCPU 2EA, Memory 4GB
.노드수 : 1
Subbet : ss-vpc-kube-sub2
> 추가 > 다음
3단계 : 인증키설정
인증키 선택 : 이미 생성해둔 인증키 선택
Ø 생성하기
Ø
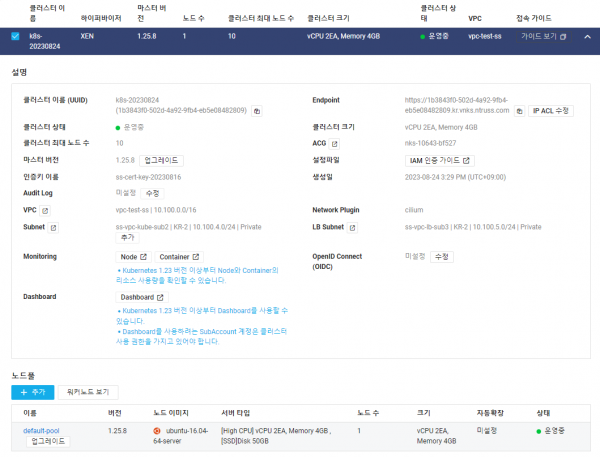
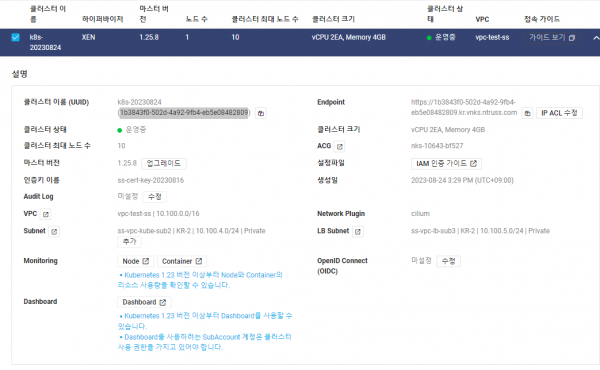
생성한 Kubernetes Cluster 확인하기
Containers > Kubernetes Service > Clusters > 해당Cluster 선택 >
2. NAT GW 생성
외부 통신을 위한 NAT Gateway 생성 및 연결설정
VPC > NAT Gateway > +NAT Gateway생성 >
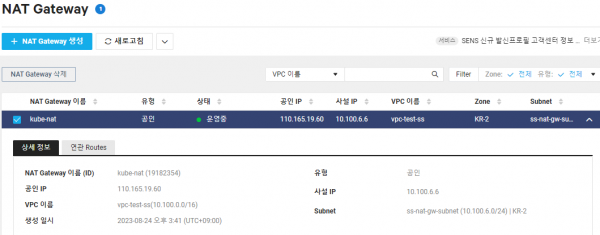
.NAT Gateway 이름 : kube-nat
.유형 : 공인
.VPC : vpc-test-ss
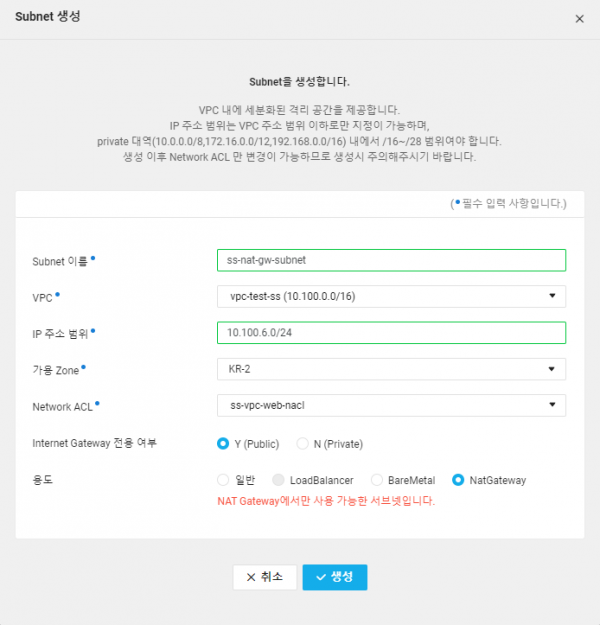
.서브넷선택 : ss-nat-gw-subnet
오른쪽 “서브넷생성”클릭해서 생성함.
*각 서비스 Zone에 NAT Gateway를 배치할 전용 서브넷을 생성하셔야 합니다.
.공인IP : 공인IP신청
> 생성 >
생성된 NAT Gateway 확인
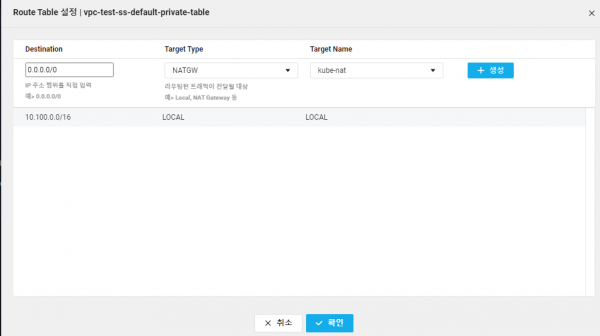
3. Route 설정
VPC > Route Table > “vpc-test-ss-default-private-table”선택 > “Route 설정” >
.Destination : 0.0.0.0/0
.Target Type : NATGW
.Target Name : kube-nat
> +생성
4. Kubectl config 설정
Kubernetes Service는 ncp-iam-authenticator를 통해 IAM 인증을 제공한다.
IAM 인증을 통해 kubectl 명령을 사용하려면 ncp-iam-authenticator를 설치하고 이를 인증에 사용하도록 kubectl 설정 파일을 수정해야한다.
다음과 같이 리눅스 1서버에서
ncp-iam-authenticator 실행파일(바이너리파일) 설치
1단계 : ncp-iam-authenticator 다운로드 및 설치
ncp-iam-authenticator 파일을 홈디렉토리에
다운로드
|
[root@ss-linux-01 ~]# cd ~ [root@ss-linux-01 ~]# [root@ss-linux-01 ~]# curl -o ncp-iam-authenticator https://kr.object.ncloudstorage.com/nks-download/ncp-iamauthenticator/v1.0.0/linux/amd64/ncp-iam-authenticator % Total % Received % Xferd Average Speed Time Time Time Current Dload Upload Total Spent Left Speed 100 335 100 335 0 0 3306 0 --:--:-- --:--:-- --:--:-- 3316 [root@ss-linux-01 ~]# -rw-r--r-- 1 root root 335 Aug 24 15:54 ncp-iam-authenticator [root@ss-linux-01 ~]# |
[참고:옵션작업]
(선택) SHA-256 SUM을 사용하여 다운로드한 바이너리 파일을 확인할 수 있습니다.
a. ncp-iam-authenticator 바이너리 파일의 SHA-256 합계를 확인합니다.
|
openssl sha1 -sha256 ncp-iam-authenticator |
b. SHA-256 SUM을 다운로드 합니다.
|
curl -o ncp-iam-authenticator.sha256 -L https://github.com/NaverCloudPlatform/ncp-iam-authenticator/releases/latest/download/ncp-iam-authenticator_SHA256SUMS |
c. 두 값이 일치하는지 확인합니다.
2단계 : 실행파일 추가
|
[root@ss-linux-01 ~]# chmod +x ncp-iam-authenticator [root@ss-linux-01 ~]# [root@ss-linux-01 ~]# ls -l ncp-iam-authenticator -rwxr-xr-x 1 root root 335 Aug 24 15:54 ncp-iam-authenticator [root@ss-linux-01 ~]# |
3단계 : $HOME/bin/ncp-iam-authenticator를 생성 하고 PATH 추가
|
[root@ss-linux-01 ~]# mkdir -p /root/bin && cp ./ncp-iam-authenticator /root/bin/ncp-iam-authenticator && export PATH=$PATH:/root/bin [root@ss-linux-01 ~]# |
4단계 : bash_profile에 생성한 PATH 추가하고 확인
|
[root@ss-linux-01 ~]# echo 'export PATH=$PATH:$HOME/bin' >> ~/.bash_profile [root@ss-linux-01 ~]# [root@ss-linux-01 ~]# cat /root/.bash_profile # .bash_profile
# Get the aliases and functions if [ -f ~/.bashrc ]; then . ~/.bashrc fi
# User specific environment and startup programs
PATH=$PATH:$HOME/bin
export PATH export PATH=$PATH:$HOME/bin [root@ss-linux-01 ~]# |
5단계 : ncp-iam-authenticator명령어가 잘 작동하는지 확인
|
[root@ss-linux-01 ~]# ncp-iam-authenticator help cli written to authenticate with iam in ncloud kubernetes service
Usage: ncp-iam-authenticator [command]
Available Commands: create-kubeconfig Get Kubeconfig to access kubernetes help Help about any command token Authenticate using SubAccount and get token for Kubernetes update-kubeconfig update Kubeconfig to access kubernetes version Show the version info of the ncp-iam-authenticator
Flags: --credentialConfig string credential config path (default : ~/.ncloud/configure) --debug debug option -h, --help help for ncp-iam-authenticator --profile string profile
Use "ncp-iam-authenticator [command] --help" for more information about a command. [root@ss-linux-01 ~]# |
이제 다음과 같이 IAM 인증을 위해 kubeconfig를 생성한다.
Kubeconfig 생성 시 ncp-iam-authenticator 를 통해 진행해야한다.
이 때 ncp-iamauthenticator를 사용하기 위해서 먼저 API 인증키값을 설정
|
[root@ss-linux-01 ~]# export NCLOUD_ACCESS_KEY=<사용자의 Access Key> [root@ss-linux-01 ~]# [root@ss-linux-01 ~]# export NCLOUD_SECRET_KEY=<사용자의 Secret Key> [root@ss-linux-01 ~]# [root@ss-linux-01 ~]# export NCLOUD_API_GW=https://ncloud.apigw.ntruss.com [root@ss-linux-01 ~]# |
사용자 환경 홈 디렉터리의 .ncloud 폴더에 configure 파일 생성
|
[root@ss-linux-01 ~]# cd ~ [root@ss-linux-01 ~]# mkdir .ncloud [root@ss-linux-01 ~]# [root@ss-linux-01
~]# vi ./.ncloud/configure [root@ss-linux-01 ~]# [root@ss-linux-01 ~]# cd .ncloud [root@ss-linux-01 .ncloud]# [root@ss-linux-01 .ncloud]# cat configure [DEFAULT] ncloud_access_key_id = ACCESSKEYACCESSKEYAC ncloud_secret_access_key = SECRETKEYSECRETKEYSECRETKEYSECRETKEYSECR ncloud_api_url = https://ncloud.apigw.ntruss.com [project] ncloud_access_key_id = ACCESSKEYACCESSKEYAC ncloud_secret_access_key = SECRETKEYSECRETKEYSECRETKEYSECRETKEYSECR ncloud_api_url = https://ncloud.apigw.ntruss.com [root@ss-linux-01 .ncloud]# |
ncp-iam-authenticator create-kubeconfig 명령을 사용하여 kubeconfig를 생성
Cluster UUID는 Products & Services > Kubernetes Service 에서 생성한 Cluster를 클릭하면 클러스터 이름 옆에서 확인 가능하다.
|
[root@ss-linux-01 ~]# ncp-iam-authenticator create-kubeconfig --region KR --clusterUuid 718b2dcf-0569-4a0e-b1fd-d0be3e528e19 > kubeconfig.yml [root@ss-linux-01 ~]# [root@ss-linux-01 ~]# ls -l kubeconfig.yml -rw-r--r-- 1 root root 33 Aug 28 12:45 kubeconfig.yml [root@ss-linux-01 ~]# |
주의 : 이렇게 실행하고 나면.. kubeconfig-718b2dcf-0569-4a0e-b1fd-d0be3e528e19.yaml 파일을 kubeconfig.yml파일로 변경한다.
내용을 확인해보면 kubeconfig-718b2dcf-0569-4a0e-b1fd-d0be3e528e19.yaml파일이 진짜 yml파일임을 알 수 있기 때문이다.
|
[root@ss-linux-01 ~]# ls -l total 60140 drwxr-xr-x 2 root root 35 Aug 28 12:31 bin -rw------- 1 root root 2333 Aug 28 13:32 kubeconfig-718b2dcf-0569-4a0e-b1fd-d0be3e528e19.yaml -rw-r--r-- 1 root root 33 Aug 28 13:32 kubeconfig.yml -rwxr-xr-x 1 root root 49864704 Aug 28 13:28 kubectl drwxr-xr-x 6 501 20 71 Apr 23 2020 lab_source -rw-r--r-- 1 root root 40960 Oct 27 2020 lab_source.tar -rwxr-xr-x 1 root root 11665408 Aug 28 13:24 ncp-iam-authenticator -rw-r--r-- 1 root root 508 Aug 28 13:25 ncp-iam-authenticator.sha256 [root@ss-linux-01 ~]# [root@ss-linux-01 ~]# mv kubeconfig-718b2dcf-0569-4a0e-b1fd-d0be3e528e19.yaml kubeconfig.yml mv: overwrite ‘kubeconfig.yml’? y [root@ss-linux-01 ~]# |
Kubeconfig 파일이 생성되면 kubectl 명령어를 테스트한다.
|
[root@ss-linux-01 ~]# kubectl get namespaces --kubeconfig kubeconfig.yml NAME STATUS AGE default Active 91m kube-node-lease Active 91m kube-public Active 91m kube-system Active 91m [root@ss-linux-01 ~]# |
Kubeconfig 파일이 지정이 번거로울 경우, 아래와 같이 bash_profile 에 alias로 명시한다.
|
[root@ss-linux-01 ~]# vi ~/.bash_profile
# .bash_profile
# Get the aliases and functions if [ -f ~/.bashrc ]; then . ~/.bashrc fi
# User specific environment and startup programs
PATH=$PATH:$HOME/bin
export PATH export PATH=$PATH:$HOME/bin alias
kubectl='kubectl --kubeconfig="/root/kubeconfig.yml"' -> 파일
맨 밑에 alias 내용 추가 [root@ss-linux-01 ~]# source ~/.bash_profile [root@ss-linux-01 ~]# [root@ss-linux-01 ~]# cat .bash_profile # .bash_profile
# Get the aliases and functions if [ -f ~/.bashrc ]; then . ~/.bashrc fi
# User specific environment and startup programs
PATH=$PATH:$HOME/bin
export PATH export PATH=$PATH:$HOME/bin alias kubectl='kubectl --kubeconfig="/root/kubeconfig.yml"' [root@ss-linux-01 ~]# |
Namespaces 란 동일한 물리 클러스터를 기반으로 하는 여러 가상 클러스터를 지원하며, 이런 가상 클러스터를 네임스페이스라고 합니다.
쿠버네티스 클러스터내에서 논리적인 분리 단위 이며 쿠버네티스의 Namespace 별로 리소스를 구분되어 있습니다.
Namespace 에 대한 리스트는 아래와 같이 조회 할 수 있습니다.
~$ kubectl get ns
또는
~$ kubectl get namespace
|
[root@ss-linux-01 ~]# kubectl get namespaces NAME STATUS AGE default Active 98m kube-node-lease Active 98m kube-public Active 98m kube-system Active 98m [root@ss-linux-01 ~]# |
5. Pod 생성
Container에 올라간 이미지를 이용하여 Pod를 생성
1단계 : Container Registry 의 Access/Secret Key 를 저장한 Secret 오브젝트 생성
|
[root@ss-linux-01 ~]# kubectl create secret docker-registry regcred --docker-server=<private-registry-end-point> --docker-username=<access-key-id> --docker-password=<secret-key> --docker-email=<your-email> secret/regcred created [root@ss-linux-01 ~]# |
커맨드 라인에서 자격 증명을 통하여 시크릿 생성하기
regcred 라는 이름의 시크릿을 생성하자.
아래의 각 항목에 대한 설명을 참고한다.
<your-registry-server> 은 프라이빗 도커 저장소의 FQDN 주소이다. 도커허브(DockerHub)는 https://index.docker.io/v1/ 를 사용한다.
<your-name> 은 도커 사용자의 계정이다.
<your-pword> 은 도커 사용자의 비밀번호이다.
<your-email> 은 도커 사용자의 이메일 주소이다.
이를 통해 regcred 라는 시크릿으로 클러스터 내에서 도커 자격 증명을 생성했다.
2단계 : Pod 생성
create_only_pod.yaml 파일 생성 및 배포
image: registry-name 값 변경
|
[root@ss-linux-01 ~]# cd lab_source/ [root@ss-linux-01 lab_source]# cd lab3 [root@ss-linux-01 lab3]# [root@ss-linux-01
lab3]# vi create_only_pod.yaml kind: Pod metadata: name: apache-pod namespace: default spec: containers: - name: apache-pod image: <private-endpoint>/image_apache:1.0 imagePullSecrets: - name: regcred |
|
[root@ss-linux-01 lab3]# kubectl create -f create_only_pod.yaml pod/apache-pod created [root@ss-linux-01 lab3]# [root@ss-linux-01 lab3]# kubectl get pods -o wide NAME READY STATUS RESTARTS AGE IP NODE NOMINATED NODE READINESS GATES apache-pod 1/1 Running 0 14s 198.18.0.147 default-pool-w-3b54 <none> <none> [root@ss-linux-01 lab3]# |
3단계 : ,Deployment 오브젝트 Pod 생성
create_deployment.yaml 파일 수정
image: registry-name 값 변경
|
[root@ss-linux-01 lab3]# vi create_deployment.yaml apiVersion: apps/v1 kind: Deployment metadata: name: apache-deployment spec: replicas: 3 selector: matchLabels: app: apache template: metadata: labels: app: apache spec: containers: - name: apache image: <private-endpoint>/image_apache:1.0 ports: - containerPort: 80 imagePullSecrets: - name: regcred
[root@ss-linux-01 lab3]# [root@ss-linux-01 lab3]# kubectl apply -f create_deployment.yaml deployment.apps/apache-deployment created [root@ss-linux-01 lab3]# [root@ss-linux-01 lab3]# kubectl get pods NAME READY STATUS RESTARTS AGE apache-deployment-7bfc67956b-4drgf 1/1 Running 0 6s apache-deployment-7bfc67956b-dd7xc 1/1 Running 0 6s apache-deployment-7bfc67956b-srvcm 1/1 Running 0 6s apache-pod 1/1 Running 0 97s [root@ss-linux-01 lab3]# |
4단계 : Deployment로 생성한 Pod에 Service 연결
Deployment 로 생성한 Pod 에 Service 연결
create_service.yaml 파일 생성
|
[root@ss-linux-01 lab3]# vi create_service.yaml kind: Service apiVersion: v1 metadata: name: example-service spec: ports: - port: 80 targetPort: 80 selector: app: apache type: LoadBalancer
[root@ss-linux-01 lab3]# [root@ss-linux-01 lab3]# kubectl apply -f create_service.yaml service/example-service created [root@ss-linux-01 lab3]# [root@ss-linux-01 lab3]# kubectl get service NAME TYPE CLUSTER-IP EXTERNAL-IP PORT(S) AGE example-service LoadBalancer 198.19.155.42 <pending> 80:30744/TCP 10s kubernetes ClusterIP 198.19.128.1 <none> 443/TCP 107m [root@ss-linux-01 lab3]# |
6. 로드밸런서 확인 및 서비스 접속테스트
1단계 : 생성된 LB 확인
Network > LoadBalancer > LoadBalancer > 에서 생성되어 있는 LB확인(default-example-service-aed2e>
하고 LB의 접속정보 확인
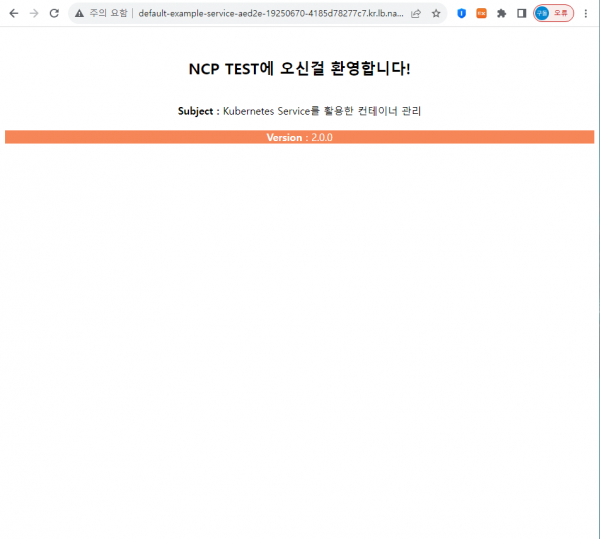
2단계 : 웹브라우즈로 접속 테스트
확인한 LB의 접속정보로 웹브라우즈에서 접속 테스트
관련자료
-
이전
-
다음

